Showing posts with label pattern review. Show all posts

Wednesday, July 3, 2013

Scoop Top...sewing for ME!

Hello, sorry for the sparse blogging here recently.  I have over booked my summer so far and seem to be having trouble finding the time to sew and blog, but I have high hopes for this month! :)  Today I've got some sewing for me! Yeah!  If you haven't tried Kristin's Scoop Top you have to give it a try. Even if you're like me and think you won't fit into the small/med. free pattern she has available; print it and see!  If it does't work she is working on a wider range of sizes, I believe. What got me to take the plunge and try it was when I saw this cute top by Anna, I thought maybe it will work, and it did!!


I didn't really change much at all other than raising the neck up a bit for my preference.  It is ultra flattering and SO comfy!  I love how the cut is fitted enough to be figure flattering, but then where mommas (at least this momma) needs a bit more room it widens out a bit to help hide that dreaded middle! I'd wear it everyday if I could. In fact it's been made for at least 3 weeks and that's been part of my problem in blogging about it.  I've worn it so much that either it or myself have needed cleaning! :)


The fabric is from JoAnn's and it is a couple of years old.  I was concerned that it would be too busy, but I really like it.  It was on hand and that was the biggest factor! :)


I did the sleeves the way Anna did and finished them like the neckline.  I think I like that better than just hemming the under.  There will be more of these great tees in my future!!


We were at my parents this past weekend and my dad has been bailing hay so I decided that might be a fun backdrop for some pictures!  I love the country and while I enjoy my city life now, being home feels like a bit of heaven! (Oh, and my mom made me a belated birthday cake, that made the weekend down right perfect!) Thanks for stopping by, have a fun and happy 4th of July!!
p.s. I couldn't leave out the cows, how can you not love cows! :)


Friday, June 7, 2013

Birthday fun (my first giveaway!)

I've got a treat today!  My birthday is Sunday and I'm hoping for at least a couple of fun surprises.  Fortunately I have one for you too!  An from Straight Grain has a new pattern; which I'm guessing you already know! :) And she's generously offered a copy for each of her testers to giveaway!  Yeah!!  After seeing all the fun dresses other testers made I can't wait to make another, I think an asymmetrical collar is calling my name!

       Tinny dress pattern sizes 1 year - 6 years

I actually gifted myself this year and bought a new camera lens.  I think it is going to be a fun new tool to have!  Here is a glimpse of my next post using my new lens. What is it about little boys that is just overwhelmingly adorable?!


To enter to win a copy of the wonderful new Tinny pattern please leave me a comment about what your ideal birthday gift would be!  And for an extra entry please tell me how you are following me!  The giveaway will be open through Monday June 10th and I'll announce the winner on Tuesday!  

Tuesday, May 7, 2013

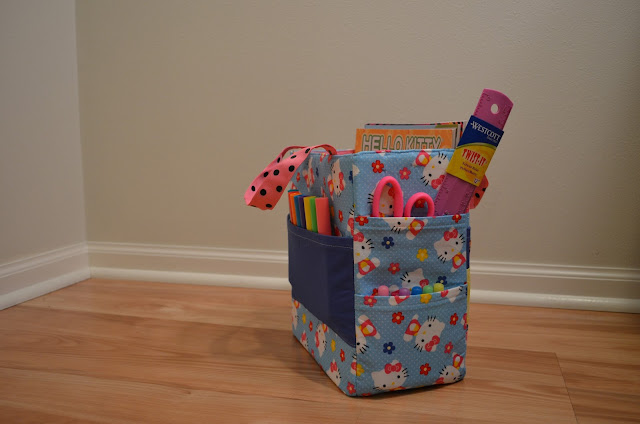
Gingercake Art Tote Review

I love promoting art to kids, and I love to give art stuff for birthday gifts to Peyton's friends!  I've had the Gingercake Art Caddy Tote pattern for awhile with the intention of making one for Peyton but it had yet to happen.  I finally decided maybe if I made one for a birthday gift I'd actually complete it! :)  


Let me start by saying this pattern is not hard at all, just time consuming with all the pockets and layers of material and interfacing.  You need a couple of prints, some cotton batting, interfacing and some stiff pellon interfacing.  Yes, that is ALOT!  However you really do get a nice sturdy tote, which I really liked.


For the fabric I was, again, trying to use what I had in my stash.  (I've been doing well with that goal, although I did place a rather substantial order for fabric last night!)  This Hello Kitty print was planned for an Open Wide Pouch but I think this was a good use too.  My one regret (I am pretty sure I have one after every project even when they turn out well!)  is that I didn't have any super great coordinates to go with the main fabric. I found some yellow and blue which work but I wish it had been better.


The other thing I want to improve on next time is the large pocket (shown in the picture above).  I think it is best used for markers but it doesn't quite keep them as straight as I want (I know I'm a bit OCD).  I think I'd put in vertical lines like on the crayon side for every two or three markers.  You'd just have to adjust the spacing for the size you are using.  


The best part is filling it up!  I loved browsing the art supply aisle at Target and picking out things.  It was kind of like back to school shopping which I LOVE!!!  I can't wait to buy Kindergarten supplies this summer! :)  I really need to make one for Peyton now!  Hopefully I can find just the right fabric for her's.  I think I want to use the a print from Ann Kelle's girlfriends line, maybe the ballet dancers!

Thanks reading, I have a dress to share later this week, hopefully! :)


Monday, April 8, 2013

The Anywhere Dress

Oh do I love this new pattern by Andrea of The Train to Crazy!  Is it the latest addition in her Go To Patterns called The Anywhere Dress.  I adore her Go to Dress and have made it many times see here and here.  This new dress is just as great. The highest compliment that you can hear when you sew clothing is "you MADE that!" and I heard that today when I picked Peyton up at preschool.  Another Mom commented on her dress and I said "yeah I made it"! Getting to say that never gets old and totally makes it worth staying up until midnight to finish my vision last night.


I took advantage of Andrea's $1 off coupon on her new pattern (it goes though today, so go get it!) and picked up the pattern over the weekend.  After looking at it I knew it would be an easy sew and I really wanted to make it right away.  I looked though my knit stash and was bummed to not find any 1.5 yard cuts to use which is her fabric requirement for the size 7 I made.  But I do love to use every last inch of fabric so I thought I'd see if a yard would work.  It did!  I folded just enough on the sides to cut the front and back I also squeezed the cuff on there too.  Then re-folded the remaining middle fabric to cut the two sleeves and facings.  YEAH! 


I thought I'd have to add length since I usually do on dresses for Peyton and Andrea mentioned it might need to be longer depending on your preferences but it was just fine and I didn't have to mess with that!  She wore it with leggings to school this morning but we are finally having a bit of spring here and it will be around 70 degrees this afternoon so I had her give me a bare leg look too! :)


I did spend quite a bit of time getting all the stripes to match up but it was worth it!  Stripes bring out my perfectionist tendencies and I just pin like crazy! :)  The fabric was also on the thinner side which isn't what is recommended but I made it work.  Actually I didn't mind the fabric at all.  It was a good way to use it since there is a facing; it helped to "bulk up" the necking and armholes.


Boy am I looking forward to spring, the grass is turning green and we can finally play in the yard again!  I think everyone looks forward to spring, but living in the Midwest where there is more winter than I like makes me so thankful for warm air and sunshine.


 I hope where ever you roam there is some sunshine today, thanks for stopping by! :)


Thursday, January 24, 2013

Ottobre pattern: Rabbit Jump Tunic and Groovy skirt

I had never heard of Ottobre before I started reading sewing blogs.  The patterns I'd see always looked so fun and modern.  I finally bought the Autumn 2012 issue back in the late summer.  I know, a long time ago!  I originally planned to sew something from it for KCWC but I burned out before I got there.  Fast forward to last week and I decided it was time!  I made the Rabbit Tunic and Groovy skirt.  I really liked the fun bubble tunic and thought Peyton would like it too.


 I had a pretty easy time with the patterns.  By far the most challenging part is converting from centimeters to inches.  I need to print a table to keep with the magazine.  Also with both of these patterns they have you use elastic tape for gathering.  I'd never done that before, but it worked pretty well. It is quicker than doing a basting stitch but maybe doesn't give you quite as even gather?  If anyone has some expertise in this area I'd love to hear from you!


The fabric I used for both the top and skirt is from Joann's.  The undershirt and leggings are from Old Navy. I could have made them, but I had them on hand and they matched! I'd rather sew the unique stuff than brown leggings.


I liked the pintucks on the front of the tunic and really liked the binding on the arms and neck.  I've never finished a garment exactly like that before.  What I love about sewing is learning something new.  I always want to perfect a new skill so I might be looking to use some elastic tape and do some pintucks again soon.


Since your can't see much of the skirt under the bubble tunic I convinced her to change clothes so you can see the skirt.


I did make one small change on the skirt.  It looked like it might be too short for my liking so I added some to the length.  I made the 122cm everywhere but in length, then I used the 140cm length in case your really interested.  This was totally necessary and it would be really short without that adjustment.  I did include the tie on the front which was Peyton's favorite thing.  She said it made it like a ballet skirt.


I have now overcome any intimidation with Ottobre patterns so you'll probably see more! :) 


Friday, January 11, 2013

Projects to start the new year!

I don't know about others, but for me when I have a deadline to sew for, like say Christmas I get a little burned out creatively.  What is it about HAVING to sew that makes it less fun?  I am anxious to get back to "real" sewing and have quite a few dresses and bigger projects brewing.


This week I've gotten a couple of small projects done to keep me happy while trying to get life back to normal after Christmas.  The first one was an Open Wide Pouch from Anna at Noodlehead.  I've wanted to make this since she shared the tutorial but it hadn't happened.  Then early this week I wandered into my local quilt shop and all the stars aligned.  There was some fun fabric right by the door that was new in the shop and then I glanced to the right and all the beautiful colored zippers were glowing in the sunshine and I bought some fabric and a matching zipper!!
I made the biggest size, cause bigger is always better right?  It went together so easily and I loved how the zipper is finished.  I can see myself making lots of these. The striped fabric on the outside is by French Bull manufactured by Windham Fabrics the line is Multi Dot.  It just looked so bright I couldn't resist!  The inside is a Moda fabric from the Hoopla line, it was in my stash.  It is currently holding Peyton's little princess dolls but I might be re-claiming it soon!


Then I decided to make a fleece pillow case for one of my daughter's friends who is having surgery today.  She likes cats and I found the perfect print at Hancock's.  I used this tutorial that I've used before, it is so easy and just takes a 1/2 yard of fleece. Peyton tried it out and approved before we gave it to her.  Her friend loved it, and that was really all I wanted.


I love quick projects, instant gratification is sometimes quite nice. Now onto the next project!

Tuesday, January 8, 2013

Love the Rollie Pollie!

Well I'm a little behind in sharing some Christmas sewing but better late than never right?  This Christmas I decided to make one handmade item for each kid and thought of Dana's Rollie Pollie knowing my daughter would love it!  The main reason I hadn't sewed one before was cost, I knew it would take a bunch of fabric and filler.  Which it does!


However, one of the many bonuses to continued sewing is you keep growing a fabric stash and currently I had enough fabric in my stash due to our JoAnn's moving store fronts this fall and clearancing all their fabric before hand to make the bag.  I also had seen an ad for bean bag filler at Bed Bath and Beyond and got the filler for even cheaper than the ad said, so I filled it for only $11! (I made the larger bag)


There are lots of bloggers who've already sewn this, so I had lots of reading info before hand.  Everyone seemed to really like the pattern and their kids have loved them.  Mine are no exception while I made this for Peyton, Carter will get in it every chance he gets! :)  He will probably be getting his own soon.

 My only tip is to follow Dana's advice and use foam for the filler. Since I got the bean bag pellets for so cheap I went that route but they have compressed quite a bit in just a couple weeks so I'll definitely use foam in Carter's.  It really was a pretty easy sew, I had some trouble getting the insert in the cover but I persevered   If you have kids this makes a great project!


Thanks for visiting!

Monday, July 23, 2012

Bubble Shorts for Shorts on the Line

I have been planning to make a pair of shorts for Shorts on the Line all month and have just not come up with exactly what I wanted until this past weekend.  Not that is not due to lack of inspiration, the flickr group is full of great shorts and that is how I first decided I wanted to do a bubble type short.  However, my daughter isn't big on shorts, she lives for dresses and skirts and I think that is why I hesitated for so long on sewing anything up.  I hate sewing things she won't wear! :)


 First I was going to make these adorable Oliver + S puppet show shorts, but they only go to size 5.  Bummer, not big enough of Peyton!  Then I discovered Peek A Boo Patterns made by Amy of Naptime Crafters.  And she has bubble shorts that were similar and I really liked how her's had a more finished front with the button and faux fly.  This is the fabric that came to my mind for them but of course I don't have any of it anymore and I think the print might have been to large anyway.  So I "shopped" through my stash and found the dots fabric I purchased from a trip to Hobby Lobby.  


What I liked about using this pattern was learning how to construct a faux fly and button front.  I'd never done that before and liked the look A LOT!  The pockets on the side are cute as well and I also liked how you finish the shorts with the band at the bottom.  Now for the problem!


This pattern I found to have good instructions but I really struggled with sizing and this pattern!!  With a waist measurement I decided to go with a size 6 but then use 3/8" seam allowance rather than the 1/2" the pattern directed to give me a bit more room in the shorts.  That was still not enough as I discovered when sewing them, and I had to make some modifications to get them to fit around her waist and legs.  Looking back I think I should have sewn the size 8.  Which is crazy, because she doesn't wear an 8 in anything, store bought or handmade! There was much struggling and seam ripping to get these to fit, and they still have some small issues.  Luckily I started with a yard of fabric and the pattern only needs a half so I think I'll re-make these with the other half and see if I can get all the "bugs" worked out.


They're still cute from behind, and the side too! :)


Sometimes you learn more from the problematic sewing projects than those that go smoothly and I am attempting to channel those feelings! I am happy with these shorts and I will give the pattern another try.  I am glad to have participated in my first sew along and have loved all the tutorials all month long.  Thanks for visiting! :)


Thursday, July 19, 2012

Go To Signature Dress Review

I have another pattern review for you today!  I've been following The Train to Crazy for quite awhile now and when Andrea first started talking about this pattern I knew I'd love it!  No surprise, I think it is fantastic!  It is very versatile like she says and has a size range of 12 months to 12 years!  How great is that?

I decided to go with the regular dress length, capped sleeves since I'd never made sleeves quite like that before, a shirred waist (I've finally have conquered shirring, YEAH), and inset pockets.  Peyton really wanted it maxi length but I wasn't sure if that was a good idea for a very active four year old, but today I saw this pattern review and will do a maxi next time!  


The fabric is by Robert Kaufman and is a print of Ann Kelle's.  I bought it at my local fabric store.  I made the size 6 and it fit her great, she wears this size in store bought clothes. (She's a tall girl)  She still has a bit of a round baby tummy, though well hidden in this dress, I noticed.  So I decided to move the shirring up about an inch from the pattern. Then I did 3 rows down from there, so that the shirring would be above her tummy.  That is the only modification I had to make.  The directions are easy to follow and there are lots of pictures to help if you get stuck.


 The pockets were a hit, but her favorite part is the heart I decided to add at the bottom.  I just used the heart pattern piece that comes with the dress and traced it slightly larger than the biggest one and cut out two pieces of purple knit, which I layered together and sewed it on with a straight stitch.  I wanted to edges to curl a bit with time.


I absolutely love this dress, There are so many ways to customize each dress while only having to use one pattern, which I love!


Thanks for visiting!  If you feel so inclined to leave a comment it would make my day!  :)

Tuesday, July 17, 2012

Birthday T-shirt

My little guy is turning one next week and I wanted to make him a shirt to wear for his party but didn't want it to scream "wearable only on your birthday".  Luckily I received a BabyCenter e-mail with different shirts you could buy at various places and this shirt was in their round up.  I fell in love immediately and, of course, pinned it! :)


What I like most is how nice and basic the design is, wearable long after the cake is eaten! :)  I originally planned to just buy a navy t-shirt and go the easy route, but I couldn't find a plain navy shirt in his size anywhere, and I couldn't find any navy fabric in town that was the right shade either! In the end I bought a XL men's shirt at Target used that.   I have been planning to buy Rae's Flashback Skinny Tee pattern and this seemed like a good reason, and I used that.   Let me just say the pattern is fantastic!  Very easy to follow and makes a very professional looking t-shirt. I will be getting plenty of use from this pattern!  


I pricked out the neckband and reused that so I only needed the shirt which I got for $5.  The orange fabric was some scrap Robert Kaufman Laguna Knit.  I used freezer paper (which if you haven't done before, try it) to make the stencil for the lettering, only using one application of paint.  I wanted it to look a bit faded.  It did get slightly off-centered but I kind of like it and you don't notice it when he's wearing it.  This was an easy naptime project which turned out just as I envisioned.  Don't you love when that happens?


It's been a fun first year and I'm looking forward to all the fun things to come...walking, talking, more playing with big sister, and of course more trouble! :)


Tuesday, July 10, 2012

One more racerback dress and a realization

Okay I'll move on now, I promise! I sewed up one more crafterhours dress and it was just as fast and easy as the first!


I did learn something with this dress, as I do every time I sew! :)  I think the pattern works better if you don't use ribbing for the neck and arm holes.  It doesn't seem to pull up as much, my arm holes were much bigger this time than the first dress, they were almost too tight on the striped dress.  You can kind of see that the arm holes are nice and generous this time.


Also I did a rolled hem lettuce edge, which I liked since the fabric has squiggles and they seem to match.  I also lengthened it even more, probably another 1.5".  So I think that is around 3" longer than the pattern. 
 I really love this dress for a fabulous summer play dress.  


And now my realization, I have been sewing some items this week for family (as in they requested and I produced) and I've decided that what drives me is learning sometime new.  I put pockets into some pants today for the first time and it went great, much easier than I thought!  I'm also working on a t-shirt for Carter's first birthday and I'm learning with it too!  (I'll be sharing that soon.)  That is what I love about sewing, the learning, and of course the part about making pretty things!  
My husband jokingly tells me that with all I am starting to know about garment sewing I'd be a nice addition to a clothing factory in China! :)  Yes, that's being supportive for him!  The growth I've made since I started sewing 3 years ago is incredible and I've loved the journey.  Glad I am starting to share it.


Monday, July 2, 2012

Striped Racerback dress


In my last post I talked about sewing up Crafterhours free Racerback dress pattern.  I loved the dress so much I quickly made one for my daughter.  I pulled out some purple striped fabric that I knew she would like and whipped one right out!  It is only 3 pieces and comes together quickly.  I did use my serger, but like they say in the directions, I think a regular sewing machine would work fine too.


This is a great pattern and makes a fun summer play dress and I will probably be making at least one more for the summer.


I love how professional the back looks and it is easy to accomplish!  I did change a few things and they are as follows.


I made the size 5-6 but used the 3-4 neckline since I thought the neck was too was too high on the first one I made.  I just scooped the neckline down when tracing the pattern but left everything else the same.  That seemed to work and I'll do it again.


I also lengthened the dress by about 1.5" lower that the pattern.  I like dresses and skirts a bit longer for my active girl and it was good but, I think I'll add another 1" next time.  I hemmed the dress with a rolled hem so I wouldn't shorten it any more, and because it is just easier with knits.  I especially feel this way when making a more casual dress like this one.  I recommend trying this dress, it is easy to make and the pattern goes from 12 months to size 8 so nice wide range! :)


Thanks for visiting!  If you like something you see I'd LOVE a comment!