Thursday, January 24, 2013

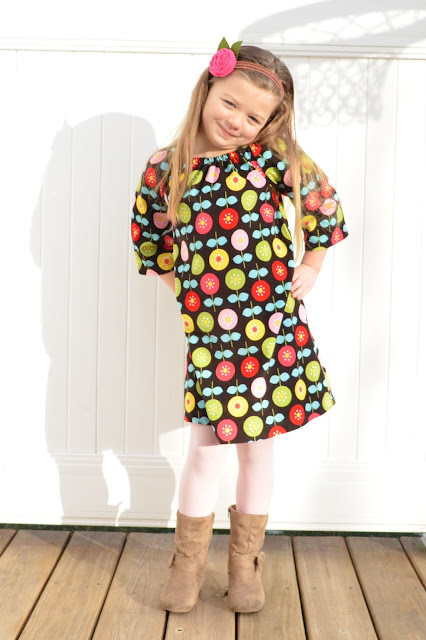
Ottobre pattern: Rabbit Jump Tunic and Groovy skirt

I had never heard of Ottobre before I started reading sewing blogs.  The patterns I'd see always looked so fun and modern.  I finally bought the Autumn 2012 issue back in the late summer.  I know, a long time ago!  I originally planned to sew something from it for KCWC but I burned out before I got there.  Fast forward to last week and I decided it was time!  I made the Rabbit Tunic and Groovy skirt.  I really liked the fun bubble tunic and thought Peyton would like it too.


 I had a pretty easy time with the patterns.  By far the most challenging part is converting from centimeters to inches.  I need to print a table to keep with the magazine.  Also with both of these patterns they have you use elastic tape for gathering.  I'd never done that before, but it worked pretty well. It is quicker than doing a basting stitch but maybe doesn't give you quite as even gather?  If anyone has some expertise in this area I'd love to hear from you!


The fabric I used for both the top and skirt is from Joann's.  The undershirt and leggings are from Old Navy. I could have made them, but I had them on hand and they matched! I'd rather sew the unique stuff than brown leggings.


I liked the pintucks on the front of the tunic and really liked the binding on the arms and neck.  I've never finished a garment exactly like that before.  What I love about sewing is learning something new.  I always want to perfect a new skill so I might be looking to use some elastic tape and do some pintucks again soon.


Since your can't see much of the skirt under the bubble tunic I convinced her to change clothes so you can see the skirt.


I did make one small change on the skirt.  It looked like it might be too short for my liking so I added some to the length.  I made the 122cm everywhere but in length, then I used the 140cm length in case your really interested.  This was totally necessary and it would be really short without that adjustment.  I did include the tie on the front which was Peyton's favorite thing.  She said it made it like a ballet skirt.


I have now overcome any intimidation with Ottobre patterns so you'll probably see more! :) 


Wednesday, January 23, 2013

My Washi Tunic

I am pretty sure every other blogger out there has already sewn a Washi tunic or dress, but I finally sewed one right before Christmas and thought I'd share it.  First off the main reason I waited so long was that I was concerned about sewing a shirt.  (Yes, this is my first one.)  I'm not exactly small chested and I was worried about having to do a bust adjustment.  

Then I saw Caila's post about her dress and thought I might be able to blend two sizes like she did.  By the way when writing this I see her post goes back to last summer! Yikes where does the time go!  
Okay back to the tunic, so I blended the L and XL sizes.  This worked out pretty well.  I think my biggest mistake was adding an inch to the bottom of the bodice to help with a larger bust, I got this idea off the washi dress flickr pool.  Lets just say I won't do that again.  My one other adjustment I'll make with the next one is to try taking a bit of fabric out of the front skirt.  For me it is a bit full and makes me feel a bit maternityish.  


The fabric is just something I liked from Hancock fabrics that was pretty inexpensive since I wasn't sure how it was going to turn out.  That's also why I choose a tunic, less fabric also means less expensive. :)   I did though buy muslin and make up a bodice before sewing with the "good" fabric.  I do really recommend this, especially if you are like me and don't have much (okay any) experience sewing for yourself.


Since it is winter I've been wearing this mostly with a black sweater.  I really want to try this again as a dress, and did want to try it with long sleeves.  But at the rate I'm going maybe I should just hope to make a dress in time for Easter! I loved all the traffic yesterday from the Train to Crazy and her Social Media Friends gathering.  I'm excited to have some new followers!  Thanks for being here!

Wednesday, January 16, 2013

Mary Engelbreit Peasant Dress

Most of the time I buy fabric because I like it.  I mean don't we all.  But in the case of this particular corduroy fabric, after receiving it in the mail, I wasn't so sure I liked it up close.  ( Isn't getting fabric in the mail the absolute best??!! )


It seemed kinda awkward or something, I do LOVE bright colors but...then I realized that the flower are very reminiscent of Mary Engelbreit's.  Who I adored as a teenager. I know who was into Mary Engelbreit as a teen?  Anyway, I am going to chalk up this choice to some deep inward love of bright and happy flowers. 


I do feel my daughter is very bright and happy so maybe that weighed into the fabric too.  Thus I've coined this dress "the Mary Engelbreit dress".  I made this dress the same way I did this one.  My only change was to do three quarter sleeves.  To do this I looked at my flashback skinny tee to decide how long they should roughly be and then lengthened the short sleeve peasant dress pattern piece.  


She wore this to church last Sunday with some light pink tights.  The dress must be a hit because as soon as it was clean again she was wearing it.  This dress definitely had to grow on me!  I am sure to some this dress is a bit crazy, but for this Mama and her 4 year old we think it is pretty FUN!

Last Sunday was a fun clothing day as I realized that 3 out of 4 family members were wearing things I'd sewn.  Carter is wearing an outfit from this fall's KCWC and I'm wearing my first washi tunic which I still need to blog about.  Why is it SO hard to get decent pictures of yourself??!!  


It is days like this that keep me sewing.  How fun to sew for your kids!  Thanks for visiting!


Friday, January 11, 2013

Projects to start the new year!

I don't know about others, but for me when I have a deadline to sew for, like say Christmas I get a little burned out creatively.  What is it about HAVING to sew that makes it less fun?  I am anxious to get back to "real" sewing and have quite a few dresses and bigger projects brewing.


This week I've gotten a couple of small projects done to keep me happy while trying to get life back to normal after Christmas.  The first one was an Open Wide Pouch from Anna at Noodlehead.  I've wanted to make this since she shared the tutorial but it hadn't happened.  Then early this week I wandered into my local quilt shop and all the stars aligned.  There was some fun fabric right by the door that was new in the shop and then I glanced to the right and all the beautiful colored zippers were glowing in the sunshine and I bought some fabric and a matching zipper!!
I made the biggest size, cause bigger is always better right?  It went together so easily and I loved how the zipper is finished.  I can see myself making lots of these. The striped fabric on the outside is by French Bull manufactured by Windham Fabrics the line is Multi Dot.  It just looked so bright I couldn't resist!  The inside is a Moda fabric from the Hoopla line, it was in my stash.  It is currently holding Peyton's little princess dolls but I might be re-claiming it soon!


Then I decided to make a fleece pillow case for one of my daughter's friends who is having surgery today.  She likes cats and I found the perfect print at Hancock's.  I used this tutorial that I've used before, it is so easy and just takes a 1/2 yard of fleece. Peyton tried it out and approved before we gave it to her.  Her friend loved it, and that was really all I wanted.


I love quick projects, instant gratification is sometimes quite nice. Now onto the next project!

Thursday, January 10, 2013

The rest of the Christmas sewing....

I thought about doing a couple of posts with the other things I made for Christmas but I decided to just put it all into one. Then I can get caught up so I can get back to my sewing machine instead of sitting at my computer!

Earlier this week I shared the rollie pollie I made for Peyton, so of course I made something for Carter too.  I went with a playmat for all the animals and cars we have.  I looked at lots of good examples and then just decided to wing it!  I did take the very lazy way out and hot glued everything down rather than sewing it.  This was my last sewing project before Christmas and I was getting pretty burned out.  I didn't think about how long it takes to design and cut out all the pieces.


I will say it is a bit too old of a toy for Carter, but he'll grow into it and for now Peyton really likes it.  I wish I had a picture of her playing with it but, oh well!


I also tackled an apron for my Grandma.  She had mentioned when we saw her last summer that she could use a new apron.  I looked around for a pattern similar to what she has, that she said she liked, and ended up using this Simplicity pattern #4987.  I made her look #3 in a small but had to shorten it up a lot as it was really long and my Grandma is under 5'.  I picked out a brown duct cloth fabric for the top and a fun teapot print for the lining.  The teapot fabric is Michael Miller and I got it here, I really love this!  She liked it but unfortunately I didn't get a picture of her in it.  Our big family Christmases always get kinda crazy and it was overlooked.


One last project.  I bought my brother and sister in law Starbucks gift cards and to dress up the gift a bit I made coffee cozies for their cups.  I used this tutorial.  For my SIL I did a scrappy one and added a bit of embroidery to it. I am by no means very good at embroidery, but I love the look it adds to some projects.  For my brother's I used some fabric left over from a pillow I made for him this year.  He picked the fabric so I assumed he'd like it on his cozy! :)  These were fun to make a went really fast.

I love to sew for other's but I've decided if I'm going to sew Christmas gifts next year I have to start before the month of December!  :)  Did you sew any gifts?  What did you make?

Tuesday, January 8, 2013

Love the Rollie Pollie!

Well I'm a little behind in sharing some Christmas sewing but better late than never right?  This Christmas I decided to make one handmade item for each kid and thought of Dana's Rollie Pollie knowing my daughter would love it!  The main reason I hadn't sewed one before was cost, I knew it would take a bunch of fabric and filler.  Which it does!


However, one of the many bonuses to continued sewing is you keep growing a fabric stash and currently I had enough fabric in my stash due to our JoAnn's moving store fronts this fall and clearancing all their fabric before hand to make the bag.  I also had seen an ad for bean bag filler at Bed Bath and Beyond and got the filler for even cheaper than the ad said, so I filled it for only $11! (I made the larger bag)


There are lots of bloggers who've already sewn this, so I had lots of reading info before hand.  Everyone seemed to really like the pattern and their kids have loved them.  Mine are no exception while I made this for Peyton, Carter will get in it every chance he gets! :)  He will probably be getting his own soon.

 My only tip is to follow Dana's advice and use foam for the filler. Since I got the bean bag pellets for so cheap I went that route but they have compressed quite a bit in just a couple weeks so I'll definitely use foam in Carter's.  It really was a pretty easy sew, I had some trouble getting the insert in the cover but I persevered   If you have kids this makes a great project!


Thanks for visiting!

Wednesday, January 2, 2013

Happy 2013

Oh my how busy things have been since mid-November!  Funny how new flooring in most of your house and then going straight into Thanksgiving and then Christmas just leaves VERY little free time!  The older I get the more I love January!  I mean the holidays are fun, but I look forward to the peace that January brings.  


I get to organize, plan, relax, read, and most of all sew.  I swore I'd sew less this past Christmas but in reality I really didn't cut back so I'll be sharing some of where my December went in the coming week.  


My big new toy is a lovely camera.  I'm still learning lots but it is certainly fun!  I'm sure it will make my pictures much nicer for the blog, and I'm exciting to see where blogging leads me this year.  
Thanks for reading! Happy January.